

Why You Need A Brand Board For Your Business
Branding tip

Why You Need To Be Using Pinterest
Biz Tip

My #1 Tip For Branding Your Business
Branding tip
The Importance of Defining Your Brand Personality
Branding Tip


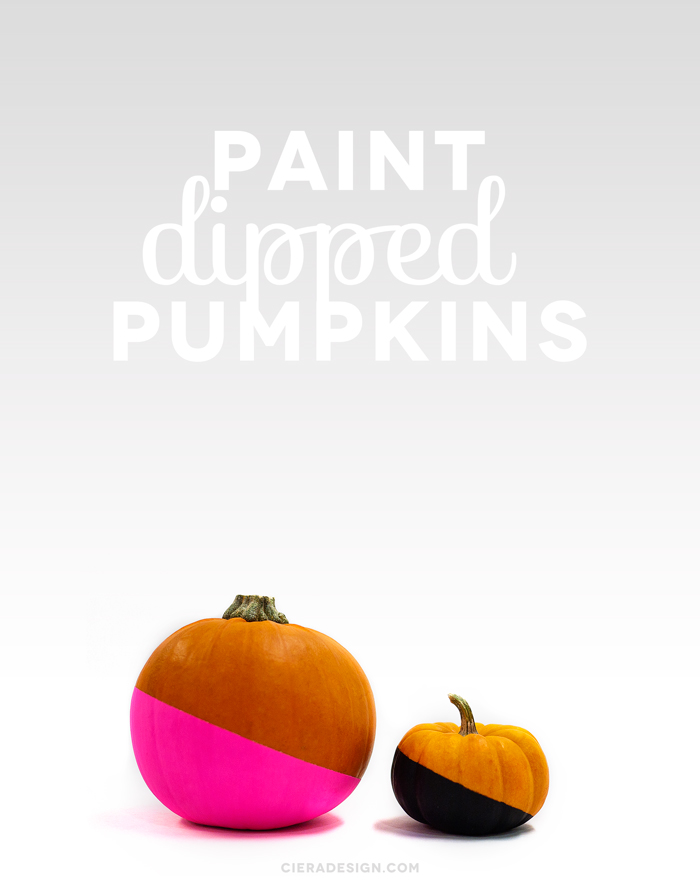
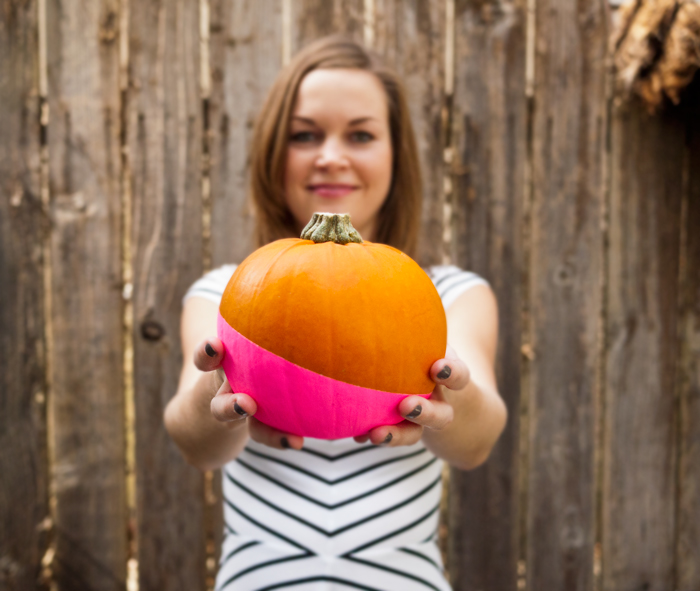
I think I’m over the whole pumpkin carving thing. It’s always harder than I remember and I end up getting frustrated that I can’t get it perfect. So this year, I decided to paint some simple color blocked pumpkins! Although I am calling them paint dipped pumpkins, they are not actually dipped, they just look like it!
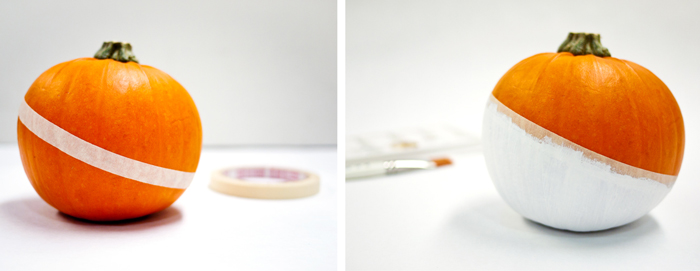
The first thing you need to do is section off your pumpkin with masking tape. You can tape it right down the center if you like, but I decided to tape mine at an angle to make it a little more interesting! Make sure the tape is firmly pressed down, otherwise your paint will run underneath it. Once you get the tape in place, you will want to prime your pumpkin with white acrylic paint. This makes sure that the color you choose is not dulled by the orange of the pumpkin. I applied two coats letting it dry in between.
After the white primer is dry, now comes the fun part! Pick whatever color acrylic paint you like and paint over the same area of the pumpkin that is now white.
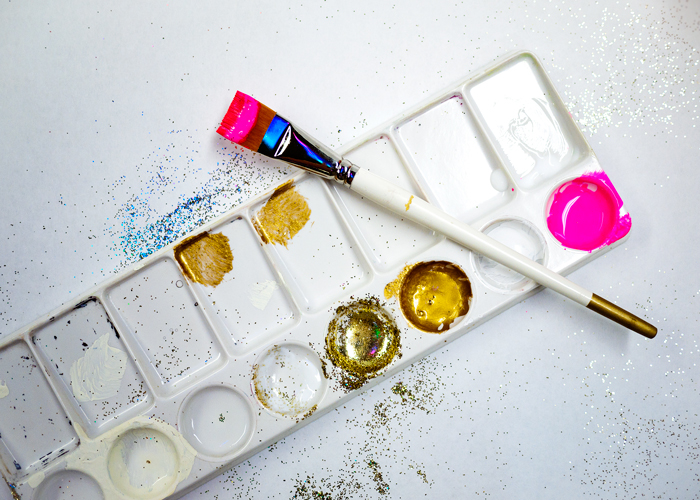
I painted one with neon pink and one with black. For the pink, it took three coats to cover fully and the black only took one coat, it just depends on the color and thickness of the paint you are using.
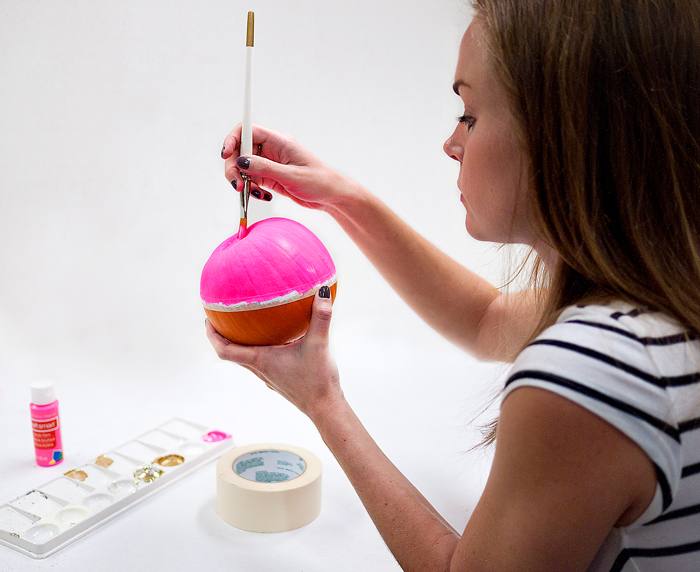
Once you achieve the coverage that you are happy with and your colored paint dries, pull the tape off being very careful not to pull the paint off with it. And there you have it, a beautifully simple dipped pumpkin!
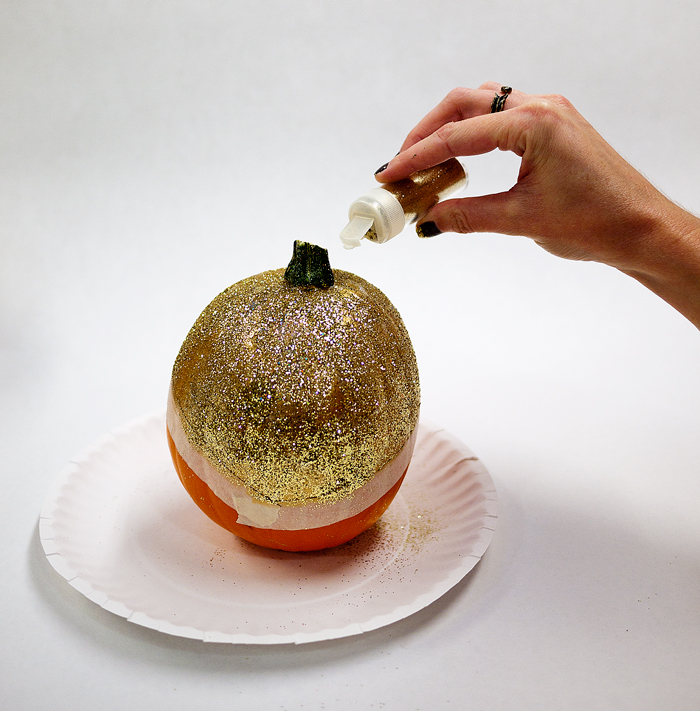
I also decided to glam this Halloween up with a glitter dipped pumpkin. For this one, instead of priming with white, I primed the pumpkin with gold acrylic paint. Once that was dry, I painted the same area with Modge Podge and then sprinkled gold glitter over the glue covered area.
Materials for painted pumpkins: masking tape, white acrylic paint, color acrylic paint, paint brush

Materials for glitter pumpkins: masking tape, gold acrylic paint, Modge Podge, paint brush, gold glitter
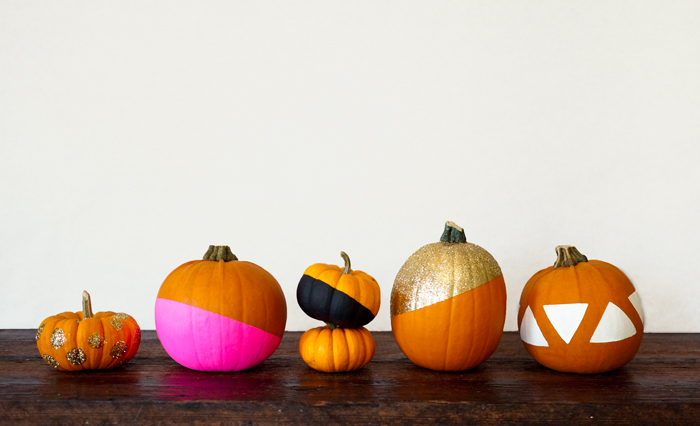
Even though Halloween is right around the corner you still have time to brighten up your home with these quick and easy DIY pumpkins!

My sister and I worked on our pumpkins together so you can head over to her blog, Sequin Crush, for even more awesome DIY pumpkins!

Pin
Previous Story
next Story

Get the free guide to learn the top mistakes when it comes to DIY branding.
6 Ways Your DIY Branding May Be Hurting Your Business
Free Guide


[…] dip-painted (tutorial by Ciera Design), […]
[…] – Decor Fix threw an amazing modern gold safari baby shower inspired by my invites! – Thanks to Kory for sharing my stock photo site roundup – Thanks to Homemade By You and Mother for featuring my paint and glitter dipped pumpkins […]
[…] (a little messy) Paint Dipped Pumpkins by Ciera Design […]
[…] dipped // ombre // marbled // painted // tribal // vase // glittered // color blocked // rainbow studded // puff […]
[…] 15. Paint Dipped by Ciera Design […]
[…] dipped // ombre // marbled // painted // tribal // vase // glittered // color blocked // rainbow studded // puff […]
[…] Paint Dipped Pumpkins by Ciera Design. Modern and chic! […]
Wow, great work and idea as well!
[…] Living 23. Glittery Pumpkins via Project Nursery 24. Decorated With Bats via No Biggie 25. Paint Dipped via Ciera […]
Hi Ciera! I’m in love with these pumpkins. They’re just beautiful and I love the colors and glitter you used.
Just letting you know I included them in my round up of favorite Halloween ideas posted on my blog today 🙂
Have a great weekend!
Hi, What a beautiful site you have and so many wonderful ideas! I love these paint dipped pumpkins! –So much so that I tried one myself! It’s not as beautiful as yours, but I thought you might like to know that I featured it in my blog post here: http://www.themommytalks.com/fun-and-easy-painted-pumpkins-for-halloween/ and I also pinned it!
Happy fall and Halloween!
Ang
Thank you so much Angelina! Your pumpkins came out cute, thanks for sharing!
Thanks so much and thanks for visiting!
Love these, Ciera! What a great way to decorate a pumpkin without having to carve it! I hope you don’t mind if I share it in a roundup of pumpkin-decorating ideas! 🙂 -April
Thank you April, feel free to share away!
I love this! I wish I had seen this sooner! If I had I would so have some glammed up, glittery pumpkins on my porch!
These are rocking pumpkins. They look like they’re about to start a glamrock group.
I find it interesting that painting pumpkins is really in this year. We still haven’t done anything with ours, but we’re probably doing the traditional carving thing.
haha, thanks! Yea, I think painting gives you more options and is not as messy as having pumpkin goo everywhere!
Very fun! i love them!
really love it 🙂
Your pumpkins look great! And now I see how simple is it to do.
I just popped over from Shannon Hearts – how fun are these pumpkins? I especially love the glittered one!
Those are way to cute – I really want to make a sparkly one now – it looks so much mess and fun!
I had glitter all over me for days!
I can imagine lol I’d be tempted to glitte
r up the other half – he would hate it but ahh well 😉
love these so fun and colorful!
Thanks Kelly!
Too much fun! I love how neat and easy you made it look. =)
Thanks Dawnielle!
[…] to do any last minute pumpkin decorating? Well here’s a pretty awesome DIY for you from Ciera Design. I rarely decorate pumpkins, but I’m definitely planning on trying […]
I love these! So stylish and easy. <3 Melissa
Thanks Melissa!
[…] one // Love the glitter on Ciera from Ciera Design’s version […]
I love your paint dipped pumpkins!! Such a fresh and modern take on pumpkin decorating. I think I’m over pumpkin carving as well. This looks WAY cuter!
My daughter, 13, loved these so much she painted her own today! So cute and it kept her busy for a whole afternoon!Thanks!♥
oh my gosh! I would love to see a photo!
How do I get you a photo?? I don’t seem to be able to upload one here anyways…she’d love it if you saw it!
Oooh I like them!
Thanks Robin!
I don’t think I’ve ever carved a pumpkin before. These are a much better alternative! I mean, who could resist a neon pink pumpkin?!
thanks Allyssa!
These are really cute! A nice change from the traditional carving… I thought about carving pumpkins this year, and then realized that I always hate carving pumpkins and get tired of it about 1/2 way through (typically right after I have to pull the insides out), so maybe I’ll paint some instead!
Thanks! Paint is much easier and neater, if you don’t want a mess, DON’T try the glitter one, I have had glitter all over me for days!
What a great idea. My little boy said they we’re pretty too 🙂
aww, so glad y’all like them!
Wow, i love your work, very modern style jeje
Thanks Ruzu!
[…] My sister and I had a fun pumpkin decorating party together. To see the steps for her color block pumpkins below head over to Ciera Design. […]